Sponsor

  • This is default featured slide 1 title

    Go to Blogger edit html and find these sentences.Now replace these sentences with your own descriptions.This theme is Bloggerized by Lasantha Bandara - Premiumbloggertemplates.com.

  • This is default featured slide 2 title

    Go to Blogger edit html and find these sentences.Now replace these sentences with your own descriptions.This theme is Bloggerized by Lasantha Bandara - Premiumbloggertemplates.com.

  • This is default featured slide 3 title

    Go to Blogger edit html and find these sentences.Now replace these sentences with your own descriptions.This theme is Bloggerized by Lasantha Bandara - Premiumbloggertemplates.com.

  • This is default featured slide 4 title

    Go to Blogger edit html and find these sentences.Now replace these sentences with your own descriptions.This theme is Bloggerized by Lasantha Bandara - Premiumbloggertemplates.com.

  • This is default featured slide 5 title

    Go to Blogger edit html and find these sentences.Now replace these sentences with your own descriptions.This theme is Bloggerized by Lasantha Bandara - Premiumbloggertemplates.com.

[GUIDE] Root Nexus 5 On Android 4.4.2 Kitkat

   Google has just seeded a new update Android 4.4.2 kitkat comes with build version KOT49H.Google fixed major bugs in this update like Camera and SMS Deniel of Service vulnerabilities.So here i am going to Root Nexus 5 Android 4.4.2 build on KOT49H with CF-Auto-Root package.

Requirements:

1] USB Drivers for Nexus 5  Download
2] Guide to unlock bootloader of Nexus 5 Here
3] Android SDK tool Download and guide Here
4] Fastboot Download
5] CF-Auto-Root package for Nexus 5 Download


Procedure:

1] Install USB drivers of Nexus 5 for transfer files from pc to phone
2] Enable USB debugging mode and go to setting > About phone and tap on Build Number several time until it says Now You Are A Developer.
3] Create a backup using any custom recovery like CWM.
4] Phone should have battery charge above 80%
5] The bootloader of Nexus 5 should be unlocked.Refers requirements for it.
6] CF-Auto-Root is working only on Android 4.4.2 kitkat build KOT49H.If your build number is different then dont use this method,it may be brick your device.
7] Download and install Android SDK tool from requirements and follow the all guide to set up it downloading platform tool and USB drive package in SDK.
8] Download the Fastboot from above and extract it to Android-sdk-windowsplatform-tools directory.
9] Download CF-Auto-Root package for Nexus 5 from above to root Nexus 5. 
10] Connect Nexus 5 to computer using USB cable And switch off your Nexus 5.
11] Go to the fastboot mode by pressing and holding Volume UP,Volume Down and Power button together until fastboot mode appears.
12]Extract the Downloaded file from step-7 on the computer and go to that extracted file location.
13]Now from CF-Auto-Root files in the flashboot directory do the following steps as per your computer OS.

Linux Users:

chmod +x root-linux.sh
Run root-linux.sh

Windows Users:

Run root-windows.bat

MAC users:

chmod +x root-mac.sh
Run root-mac.sh 

14]Wait until process is completed and follow the all onscreen instructions.
15]Once process is completed,phone takes approx. five minutes to first boot and download root checker from play-store to check the phone is rooted or not.
16]Now Nexus 5 rooted successfully.


Disclaimer:
    Author Is Not Responsible For Any Kind of Damage To Your Phone And Illegal Use By Users.   


Regards,
Droid4ever.com


Share:

Root And UnRoot Micromax Canvas 4 A210

        Canvas 4 A210 is latest device by Micromax and it is launched few weeks ago.And now it has been rooted.Now i am going to share easiest method to root and also UnRoot Micromax canvas 4 A210.In this method we can root canvas 4 by auto root tool,so its easy to root.

 **RooT**


Requirements:
 
Root Tool Download From Here
Micromax Canvas 4 A210 USB Drivers Download From Here
Micromax Canvas 4 A210 :P


Procedure:
 
1]First enable developer mode from Setting > About phone > Press build number 8 times.
 2]Enable USB debugging mode.
3] Now connect Micromax canvas 4 A210 to your PC by using USB cable.
4]Now download root tool from above and extract all files.
5]Now run the Run.bat file from the extracted files of root tool.
6]After running file successfully,you will see the ''Finished'' .
7]Now reboot your phone.
8]Congrats.Now you have rooted your canvas 4 A210 Successfully.
 
 
 **UnRooT**
 
Requirements:
 
UnRoot Tool Download From Here 
Rooted Phone :D 
 
 Procedure:
 
1]Download above tool and extract it.
2]Run the RunMe.bat.
3]Now you will see Please Enter a valid number (1 to x).
4]Now you need to press 'x' and follow the instruction.
5]Now reboot your phone.
6]Congrats.Now you have unrooted your phone.
 
 
Disclaimer:
      Author Is Not Responsible For Any Kind of Damage To Your Phone And Illegal Use By Users.   
 
Regards,
Droid4ever.com 


Share:

Root Samsung Galaxy Fame S6810 And S6812 Dual On Android 4.1.2 Jelly Bean

     Hey, Today i am going to tell you in detail that how to root samsung galaxy Fame S6810 And S6812 Dual Based on Android 4.1.2 Jelly Bean.All Credit of this post is goes to +xda-developers  members.So lets start to root.

Requirements:

   
1]USB driver for Samsung galaxy Fame  Download
 2]Root Package Motochopper for Samsung galaxy Fame Download 


Procedure:  
  1. Install USB driver for Galaxy Fame from above link.
  2. Enable USB debugging mode and backup your important files.
  3. Make sure that charging of phone is more than 80%
  4. Download Motochopper.zip from above link.
  5. Connect your phone to PC using USB cable
  6. Extract Motochopper.zip.
  7. If you are on windows then run run.bat or if you are on linux run /.run.sh in terminal.
  8. Follow the all instructions on the screen.It will take some time to root.
  9. After complete the process just remove your USB and restart your phone.
  10. Now you have rooted susccesfully.
 
Disclaimer:
    Author Is Not Responsible For Any Kind of Damage To Your Phone And Illegal Use By Users.   


Regards,
Droid4ever.com


Share:

Use DroidVpn Premium Server For Free [Full Tutorial]


          Yoooo!!,Guys I am back with the new and very important tutorial.We all know that DroidVpn is most popular vpn in android.And also know that it gives only 100MB per day.So here i am going to tell you that how to use droidvpn premium account or server for free.Download Droidvpn for android from following link.

                                                 Download Droidvpn From Dropbox

You need to root your phone for installing droidvpn.Root your phone from here.For this tutorial we do not need newer version,so dont update this.In requirement we also need Android Terminal Emulator.Download it from following link.

                                    Download Android Terminal Emulator From Dropbox

Procedure: 
        
First install Android Terminal Emulator and open terminal and type su in terminal.It will give the root permission to the application.Shown in following screenshot:


Install given droidvpn 1.8.7b only and select any premium server what you want.As shown in following screenshot:


 Now click on the connect button.Now wait for some time till it will connected.See how it will look when it is connected:


 Now you established successfully connection.Now you see a one of the prompt.Just click on the upgrade later.


       After successfull connection just minimize the droidvpn and open the installed terminal emulator for android.Now go to terminal emulator and type in terminal ping google.com and hit enter button.See in following screenshot.


Now next go to task manager and kill droidvpn process .See following screenshot:


Note: 
  • Dont close droidvpn app only stop its process.
  • Do not close terminal emulator,keep it running in background


                 .Now You can surf unlimited internet using droidvpn premium servers.We know that premium server provides only 2MB data for free user.But now you can surf or download any amount of data with high speed.

   Use VPN in Android For Free Internet [Added New Config. Files]


Thanks for visiting us.Keep reading new tutorial related Android OS.


Regards,
Droid4ever.com
Share:

How To Download Apps And Games From Play Store On PC {Full Tutorial}


Droid4ever.com
Droid4ever.com
                  Hi guys, welcome back with new interesting and very important tutorial.Here now i am going to tell you that how to download android apps and games directly to PC from the play store.We know that there is no option on pc to download android apps,we need android phone to download apps from play store.So here i am going to tell you full procedure to download android apps and games from the play store with some necessary screenshots and software requires for that process.It also helpful for the android newbie and experts.
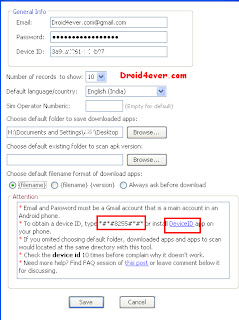
              First of all we need the software to download apps and games from play store directly,the software name as Real APK Leecher .Download full Real APK Leecher directly from here. Now download this software to your PC and extract it.You need Java Runtime latest version for this software beacause this software is based on Java. so just download it from here Java Runtime . Now run the .exe file in the Real APK Leecher  folder.The new window open,fill the all options like email,password and device ID.See below Screenshot,

{Click To Enlarge}

droid4ever.com
droid4ever.com


Make sure that email provide in this tab is must be register on play-store means the email is same as you use it in phone to access play store.Main thing is that to find the Device ID of your phone,for this just dial *#*#8255#*#*.If this code does not working then just download Android Device ID app from play store or from here,Android Device ID.Browse the location to store tha android apps rather leave it blank.See below screenshot for complete understanding for Device ID.

{Click To Enlarge} 
droid4ever.com
droid4ever.com


   Now click in the save button.Then Real APK Leecher main window will open.It take some seconds to login your account automatically.Some time it shows network error,then just click on ok and ignore it.When at right side of bottom it shows done then enter apps or game name that you want to download in your PC.See below screenshot for better understanding.

 {Click To Enlarge}
droid4ever.com 
droid4ever.com
Now list of apps or games are infront of you,Now just right click on the app that you wants to download and select click on download app option.Then the application will be start downloading as per shown in the bwlow screenshot,

{Click To Enlarge} 
droid4ever.com
droid4ever.com
Now application starts downloading,now you can see this app where you browse it.And you can upload this app anywhere without any error.Make sure that you have active internet connection.
           Here we end this tutorial,it took long time to post so if you share this tutorial anywhere just give this tutorial link for credit and must share it on facebook or other social sites using  below share button.Thanks for visiting and reading.Read our other important tutorial about android like android free internet,android vpn,etc.Thanks

Regards,
Droid4ever.com


Share:

Popular Posts

Recent Posts

Unordered List

  • Lorem ipsum dolor sit amet, consectetuer adipiscing elit.
  • Aliquam tincidunt mauris eu risus.
  • Vestibulum auctor dapibus neque.

Sample Text

Lorem ipsum dolor sit amet, consectetur adipisicing elit, sed do eiusmod tempor incididunt ut labore et dolore magna aliqua. Ut enim ad minim veniam, quis nostrud exercitation test link ullamco laboris nisi ut aliquip ex ea commodo consequat.

Pages

Theme Support

Need our help to upload or customize this blogger template? Contact me with details about the theme customization you need.